Restoration & Refinishing
At present I have included in this section some personal notes on the restoration of Aurelias from several authors. These are for illustration of some of the problems for the new owner. Since this manual was started in the 1970’s the value of Aurelias has increased greatly & the restoration of them to original specification has followed this. There are now a number of people with expertise in the restoration of these cars throughout Europe & in fact the supply of many parts is better than it was even 10-20 years ago.
It is intended that this section will include much more information about bodywork, panel replacement, re-assembly & refinishing.
Some information on the original colours is also included at the end of this section.
Note from John Savage on RUST with some editing & additions from PM:
This subject could fill a manual on its own, & the majority of Aurelias end their days as a direct result of body corrosion.
The parts most affected seem to be the side sill box sections, followed by the area round the headlights& radiator grill including the mountings & the left side end of the cross tube to which the steering box is attached. It seems vital to treat the boxed sections with some suitable protective compound whilst the metal is still good. Access to the sills can be made by injecting through the holes for the sill trim fixings. There is also a much larger hole inside the car just in front of the door near the floor.
The double skinned wheel arches are also weak points & the box section to which the rear leaf springs (Series II De Dion models) are attached.
Rust can be caused by a leaking windscreen, which allows water to run into the car unseen causing corrosion of the bulkhead & floor behind the soundproofing & floor coverings.
The doors are also vulnerable, as the window weather seals are not designed to resist the entry of water into the doors. The drain holes of the doors must be kept open & the insides of the doors & door trim panels should be checked regularly, derusted (e.g. with phosphoric acid compounds), painted for example with red lead & coated with bitumastic paint.
Inside the boot the storage area behind the rear wheels can collect water &/or condensation & are also vulnerable to wear & corrosion from the outside.
The underneath of the car was originally coated with a black undersealing compound, which deteriorates with time leaving gaps between itself & the metal panels it was adhering to. It should be inspected & removed where loose so that rust can be treated. Cars undergoing complete strip-down & body restoration are now usually stripped completely with many owners opting for painting of the underside of the car with a clear or translucent protective coating. Some cars have been painted white underneath for obvious reasons to the owner-mechanic/restorer!
Wax-base liquids are probably good & even injecting oil engine oil with a syringe has been used.
There are now many products to resist corrosion amongst which are Shell Ensis fluid, Dinitrol, Fertan etc.
A Restoration Story
The following account has been taken from an article by Tristan Lewis published in Lanciana (American Lancia Club) in September 1978 from page 12 on, & entitled ‘Restoration of a 1957 Lancia Aurelia B20 GT Coupe Part 1 – Initial Restoration’. I have edited it extensively (PM – 2007).
Tristan Lewis worked for Racing International, New Preston, Connecticut, which was a car restoration business specialising in European cars & founded in 1973. The restoration of B20S-1407, owned by John Curtis & his family from new with a gap of five years, was started on January 20th 1978.
First, some general tips for all you would-be Lancia restorers – the workshop manual is a must! More damage is done by improper disassembly than any other single error, & as you will appreciate, mistakes can be quite expensive, especially on a car such as this.
Second, be certain that you have plenty of small plastic containers or bags & stringed tags for labelling the parts as you disassemble the car. This will avoid the confusion when you begin reassembly.
Third, be sure you have the right tools: metric nuts require metric spanners & will prevent a lot of frustration & damage to parts.
Use a camera & take photographs of everything, body, interior, engine & suspension, both before & during disassembly. You’ll be surprised how useful such photos are during the restoration.
Now you can begin & a typical action plan is as follows.
- Disconnect & remove the battery
- Drain fluids – water & oils
- Strip out the interior
- Remove the engine, wiring & accessories in the order
We began by removing the front seats, but because the adjuster levers were broken it became a two-person task taking 20 minutes.
Remember it is a good idea to keep mating parts together, e.g. nuts & bolts, screws, brackets etc. fixing the seats should be kept with the seats, or even partly reassembled off the car.
Then the rear seat, which is held in place by several screws & was easily removed.
Now we climbed aboard & went to town removing the door trim panels which are also held by screws to the door along with a tapered pin through the door handle. Place the screws back in the panel & tape into place from the rear side. Unscrew the top door trim.
The door mechanisms will not be removed until later when there is little chance of smearing oil or grease on reusable interior trim items.
Removing the parcel shelf will require care over the weakly attached studs fixing the aluminium strips as these are very easily broken off. Note that the luggage strap mounts help support the shelf.
After removing the interior lights & rear ¾ panels can be taken out. Be sure to mark the position of the felt shims & attach the beading to the panel.
Remove all the accessories such as the mirror & sun visors, leaving the dashboard & instruments & steering wheel until later.
The interior fittings are now out except for the head lining which is a tricky job requiring two people & patience. The headlining is held in place by several hoops, the rear window frame & the windshield surround. The centre hoops are attached by screws. At the front the liner is fastened over a hoop by wire clips, which are very sharp – so be careful. The rear will have to wait, so fold the headlining back very carefully.
The carpets & sound deadening material are removed last. We allowed two days for this operation & ‘care’ is the byword!
Removal of the glass: Remove the door glasses first by unscrewing two retaining bolts, & the glass lifts straight out. The rear side windows are mounted to bolts running through the door pillar & everything comes off together: chrome strip, rubber seals & the glass as a unit. Next the windscreen & the rear screen: If you have no experience perhaps you should get an auto glass expert to remove them, as they are easily broken & expensive to replace. It is not that difficult to remove the screens, but requires care & patience especially if you hope to retain the rubber seal. The rear screen rubber seal holds the headlining in place.
Dashboard. Photographs or drawings are a must here for later reference. Number all the switches & instruments on the photo/drawing & tag & mark the items on removal. When the instruments have been removed store them in bags with their trims & holding brackets. Once the wiring & instruments have been removed from the dashboard, it can be dismantled from the car by unscrewing the eight mounting bolts.
The steering column is held in place by a bracket at the bulkhead/firewall & a splined shaft at the steering box. The bracket is secured to the body by two bolts, which are easily removed. The splined joint however can be difficult to separate – avoid damaging it!
Now that we don’t have to worry about grease, the door mechanisms can be removed as a unit without releasing any of the tension devices in the window lifting mechanism. A very important factor in rebuilding old cars to ‘new’ is to maintain original manufacturer specifications insofar as possible. In this instance, trying to reset tension in the window lift mechanism could eventually result in stress & breakage of the glass.
The car’s exterior fittings should be removed now including all the chrome – door trim strips, headlight/taillight trims, radiator grille & bumpers. These pieces should be stored very carefully until refitting or to be sent out for chrome plating.
We now direct our attention to the engine bay & the removal of the beautiful Lancia V-6 engine. First drain all the fluids to avoid making a mess later on & for ease of access. Disconnect all the wiring & pipes between the engine & the body. Remove the radiator & disconnect the propeller shaft from the flywheel. It is wise to remove the bonnet & to remove or protect the brake/front suspension fluid reservoirs unit, which is very easily damaged during this operation.
Double check that the engine is free to lift from the car before attaching the lifting device & removing the four engine mounting bolts. We recommend using heavy-duty nylon rope looped round the four engine mountings as steel chain can chafe the aluminium castings badly.
The last major component to be removed from the upper part of the car is the wiring harness. It can be taken out as a single unit without separating wires, but make sure you have labelled everything as you detached wires from components. To remove the harness start by unscrewing the fuse box from its base along with the headlight changeover relay. Unscrew the remaining relays & voltage regulator from the bulkhead. Now you can pull the harness through the hole in the bulkhead/firewall with its special grommet. Store it carefully having inspected it for broken wires, frayed insulation, worn out or broken connectors & decide if a new harness would be advisable.
Other components to remove are the suspension oiling system, master cylinder(s) & the pedal box. Now all has been removed accept the floor gear change mechanism – a column gearshift would require a modified procedure.
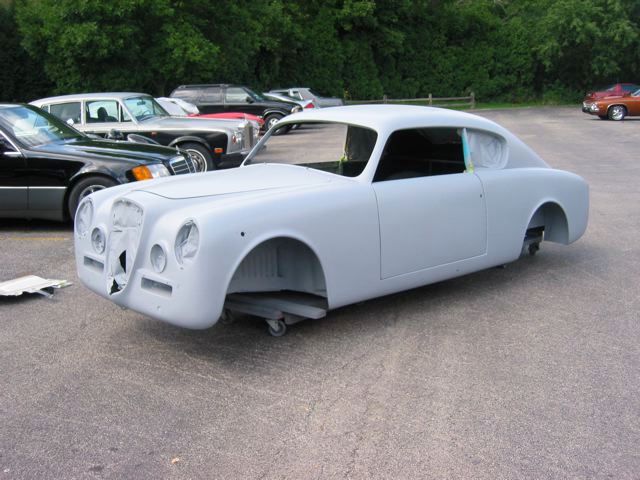
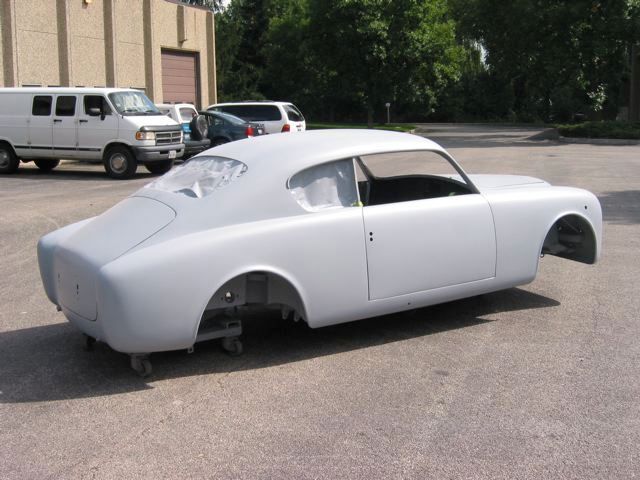
It is best to keep the car as a ‘rolling’ chassis for as much of the time as possible, but if the bodyshell is to be brought down to a bare shell, then the front axle/suspension & rear axle/suspension & propelling unit will need to be removed. In the case of this car the shell was to be dipped for 24 hours to remove all the paint & protection materials, debris & surface rust. We recommend this prior to professional painting.
If you remove the paint etc. by hand, we suggest using an industrial stripper such Du Pont’s & for the engine bay & undersides use a sandblaster with 50-grade sand. Any metal that does not come completely clean should be carefully treated with muriatic acid solution.
When finished one way or the other, you should have a clean metal body shell ready to go the paint shop. It may be more convenient to finish the undersides first & then reattach the front & rear axles so that you once again have a ‘rolling’ chassis for the paint shop.
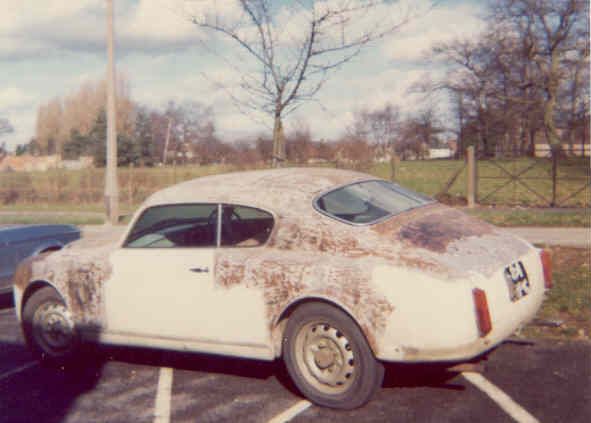
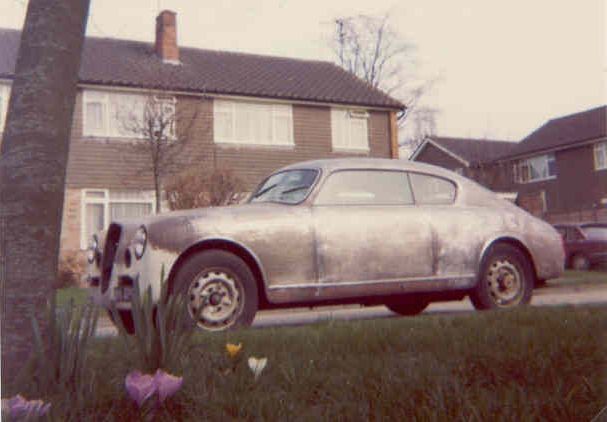
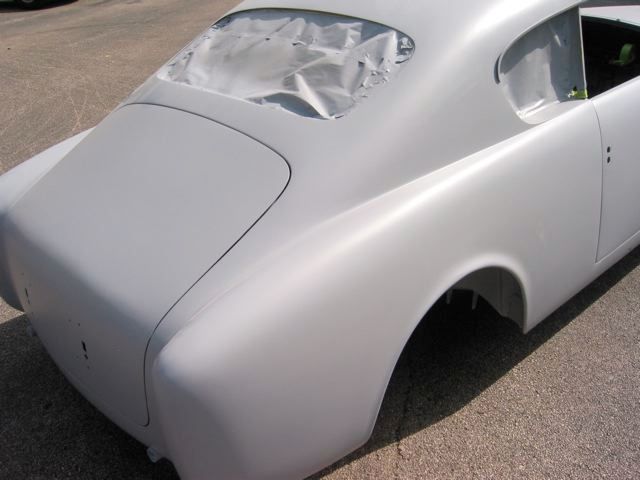
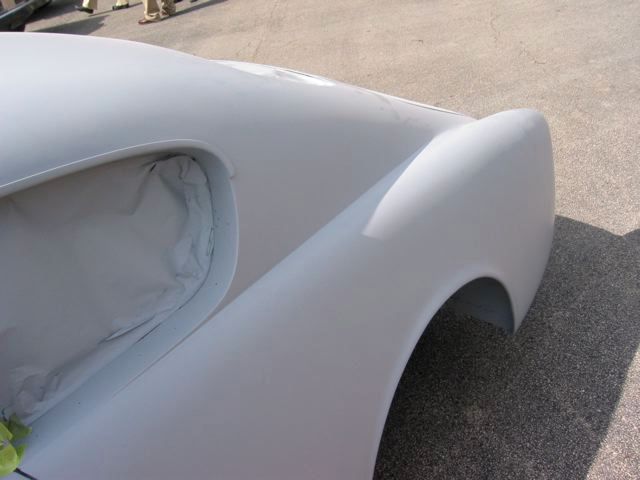
March 1977 – Stages in hand-stripping the paint on my B20-3609. – Paul Mayo
The following is extracted from a piece by Jim Steerman in Lanciana No.3, 1972 published by the American Lancia Club & titled ‘Aurelia Paint & Bodywork’
The problem with repainting these cars is the primer. Pininfarina (PF) states (in correspondence with Steerman) that the primer & original paint were of the old nitrocellulose type & the more modern synthetic & acrylic paints will not stick to it. If however, the primer is in good condition, one can (could) obtain the original nitrocellulose paints & repaint the car, but the paint will probably fade rapidly. The paint supplier was Colorificio Italiano Max Meyer S.A., Milano. Otherwise modern paints should be applied to a bare body shell with the original primer stripped off.
Aurelias are welded together with surprising care, roughly file finished & then sprayed with a very heavy primer-surfacer. It is this thick, putty-like coating, which is sanded to a fine finish, & sprayed with the colour coats. (It is believed that Pininfarina employed young apprentices at a pittance to apply the thick undercoat, which normally involved 6 to 8 boys a few days to apply, smooth & sand). This primer-surfacer is apparently chemically & texturally incompatible with most paints which might be sprayed on top of it & will cause them to display orange peel, cracks, & fall off in great sheets (this is not a story as many owners have suffered this including myself – Paul Mayo).
The best plan is to remove all the original paints & prepare the body thoroughly for modern paint finishes.
PF was a bit uncertain as to which colours were offered on the B24 Spider, but was sure that Ivory, Light Green, Red & White were available. The B24 Convertible was offered in the above four colours plus Light Blue, Light Grey & a very attractive ‘silver-grey’ metallic. All these were in nitrocellulose paints & the colour wheel states “Tinte Originali Convertible GT 2500”. See further information below.
Colours Used on Aurelias
A subject of much discussion. The records exist for a very close match to be made for a colour, but given the changes in paint technology & the ageing of paint including colour samples, the choice of colour is likely to involve some degree of subjective choice.
In particular Lancia C's.description of colours leaves room for uncertainty. For example "Beige" is used widely in the Lancia Aurelia production data, but there are several colours evident in colour samples, paint literature & from the evidence from the cars themselves which allow for choice.
LANCIA (ENGLAND) LIMITED
LANCIA CARS ARE SUPPLIED IN THE COLOURS GIVEN BELOW, WITH CLOTH UPHOLSTERY
This data is copied from a period Lancia (England) Limited memo probably from about 1954-55 and covering the B12 and 4th series B20 GT2500. The colour descriptions in the first column are not those given in the Max Meyer paint catalogues of the time. The likely Max Meyer colour names are given in column two.
Many more colours than these standard ones available in the UK could be ordered from the Max Meyer colour range.
AURELIA Series II Standard Saloon and APPIA Standard Saloon
| Body Colour | Likely Max Meyer Colour Name | Colour of Cloth |
|---|---|---|
| Light Grey | Grigio Marones | Grey |
| Dark Grey | Grigio Scuro | Grey |
| Black | Nero | Grey |
| Blue | Bleu Medio | Grey |
| Dark Blue | Bleu Lancia | Grey |
| Green | Verde Medio Or Verde Ardenza | Fawn |
| Maroon | Amaranto Montebello | Fawn |
| Beige | Grigio Escoli | Fawn |
AURELIA GRAN TURISMO 2500
| Body Colour | Likely Max Meyer Colour Name | Colour of Cloth |
|---|---|---|
| Pearl Grey | Grigio Newmarket | Grey |
| Maroon | Amaranto Montebello | Grey |
| Dark Blue | Bleu Lancia | Grey |
| Black | Nero | Fawn |
| Dark Green | Verde Ardenza Or Verde Lancia (Glasurit) | Fawn |
| Beige | Grigio Escoli | Fawn |
From Factory Sales Brochures covering Aurelia models and other information the following is observed:
| Model | Body Colour | Max Meyer colour | Interior Trim |
|---|---|---|---|
| B20 series 3 | Maroon | ||
| Dark Blue | |||
| B20 series 4 late My original car B20-3609 | Light grey, ‘Beige’ in Italian | Grigio Marones | Panno Nocciola or Fawn/Hazel brown |
| B20 series 6 | Beige | Grigio Escoli | Fawn |
| Pale blue | Azzurro La Plata | ||
| Pale met. blue | Celeste Ardenza | ||
| Silver grey | Grigio Newmarket | ||
| Dark met. grey | Grigio Flemington | ||
| Pale met. green | Verde Parioli | ||
| B24 Spider | Beige | Red | |
| Primrose Yellow | Red | ||
| B24 Convertible | Beige | Charcoal | |
| Beige | Fawn | ||
| Red | Fawn |
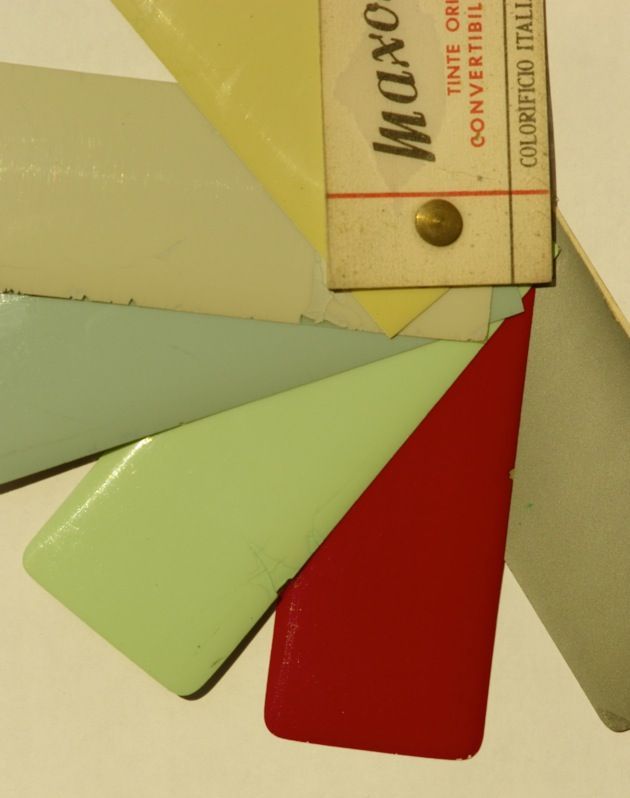
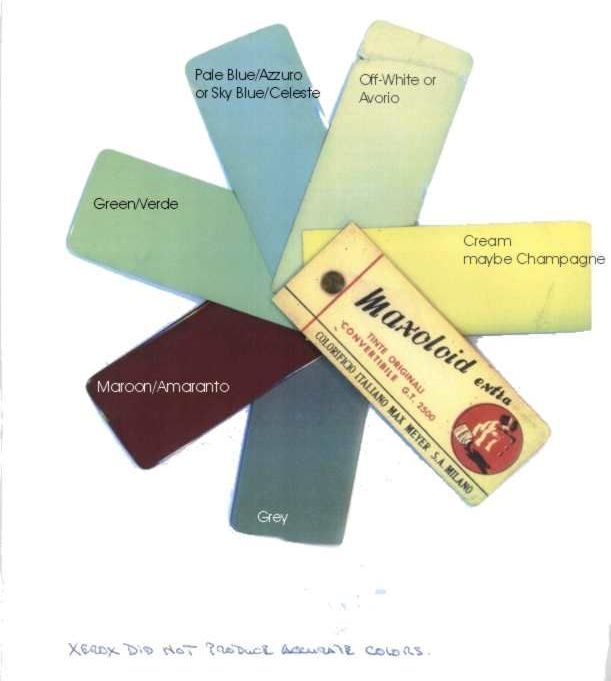
Examples of an old Max Meyer colour wheel appropriate to the Aurelia
The following data was obtained by Geoff Goldberg, Chicago, USA from the Virgilio archives in Italy. There were only pages for the Aurelia B24, as follows, & for the Appia. It would appear that the information has been compiled from the Aurelia Production Registers. Owners can obtain this information for their cars from the Registro Aurelia Italiano. The information should be regarded as indicative & not exact. Note that cars finished with leather trim had only the seat cushion & the front of the seat back finished in leather. The back of the seat back & all the rest was finished in ‘false’ leather (also called “leatherette”).
Geoff Goldberg's blog has extensive and discussion on body, trim & wheel colours – see
http://blog.lanciainfo.com.
Aurelia B24 Spider Right-hand drive
(from car 1001, 4th May 1955 to car 1059, 17 August 1955)
| Car body colour (Corpovettura) | Interior trim (Selleria) Pelle is leather/hide; Panno is woollen cloth. The colours given are alternatives |
|---|---|
| AMARANTO | pelle bleu |
| BEIGE | pelleverde/rossa |
| GRIGIO | pellegrigia / rossa / chiara / marrone / pannogrigio |
| NERO | pellechiara/rossa/verde |
| ROSSO | pellechiara |
| VERDE | pelleverde |
Aurelia B24 Spider Left-hand drive
(from car 1001, 23rd December 1954 to car 1181, 7 November 1955)
| Car body colour (Corpovettura) | Interior trim (Selleria) Pelle is leather/hide; Panno is woollen cloth. The colours given are alternatives |
|---|---|
| AMARANTO | pellechiara |
| BEIGE | pelleverde/rossa/nera/arancione |
| CELESTE | pellechiara/nera |
| CELESTINO | pellenera |
| GRIGIO | pelleverde/rossa/chiara/beige/arancione/nera/marrone/blu |
| NERO | pellearancione |
| ROSSO | pellechiara/nera/grigio |
| VERDE | pelleverde/chiara/nera |
Aurelia B24 Convertible 1st Series with 112 HP at 5300 rpm
(from car 1182, 6th August 1956 to car 1331, 14th March 1957)
| Car body colour (Corpovettura) | Interior trim (Selleria) Pelle is leather/hide; Panno is woollen cloth. The colours given are alternatives |
|---|---|
| AVORIO | pellerossa |
| AZZURRO | pellenera/nocciola/rossa |
| BEIGE | pellerossa |
| BIANCO | pellerossa/nera |
| BLEU | pellenera |
| CELESTE | pellerossa/naturale/beige/nera |
| CHAMPAGNE | pellerossa/verde/nera |
| GRIGIO | pellerossa/nera/amaranto/naturale/beige |
| GRIGIO CHIARO | pellerossa |
| GRIGIO METALL. | pellerossa |
| NERO | pellerossa/verde/bianco/amaranto/nera |
| PISELLO | pelleverde |
| ROSSO | pellenocciola/nera/beige/naturale |
| VERDE | pelleverde |
Aurelia B24 Convertible 2ND Series with 110 HP at 5000 rpm
(from car 1332, 21st December 1957 to car 1702, 5th August 1958)
| Car body colour (Corpovettura) | Interior trim (Selleria) Pelle is leather/hide; Panno is woollen cloth. The colours given are alternatives |
|---|---|
| AVORIO | pellerossa |
| AZZURRO | pellenaturale/nocciola |
| BIANCO | pellenera |
| BLEU | pellenaturale |
| BLEU METALL. | pellemarrone |
| BLEU SCURO | pellenaturale |
| CELESTE | pellenaturale/beige/nera |
| GRGIO METALL. | pellenaturale/nera |
| GRIGIO | pellerossa/naturale/nera/amaranto |
| GRIGIO CHIARO | pellerossa/amaranto/naturale/blu |
| GRIGIO FUMO | pellenera |
| NERO | pelleamaranto/rossa/avorio/beige/marrone/naturale |
| ROSSO | pellechiara/rossa/naturale |
| VERDE | pelleverde/nera |
Glossary of Colour Names in Italian & English
| Italian colour name | English colour name |
|---|---|
| Amaranto | Purple, Amaranth, Maroon |
| Arancione | Orange |
| Avorio | Ivory |
| Azzurro | Pale Blue |
| Beige | Light Grey |
| Bianco | White |
| Bleu | Blue |
| Blu | Blue |
| Celeste | Sky Blue |
| Celestino | Light Blue |
| Champagne | Champagne, Light Yellow |
| Chiaro | Bright, Clear |
| Fumo | Smoky, Dark |
| Grigio | Grey |
| Marrone | Brown, Chestnut, Maroon |
| Metall. | Metallic |
| Naturale | Natural, Unadulterated |
| Nero | Black |
| Nocciola | Hazel – Medium Reddish Brown |
| Pisello | Pea Green |
| Rosso | Red |
| Scuro | Dark, Deep |
| Verde | Green |
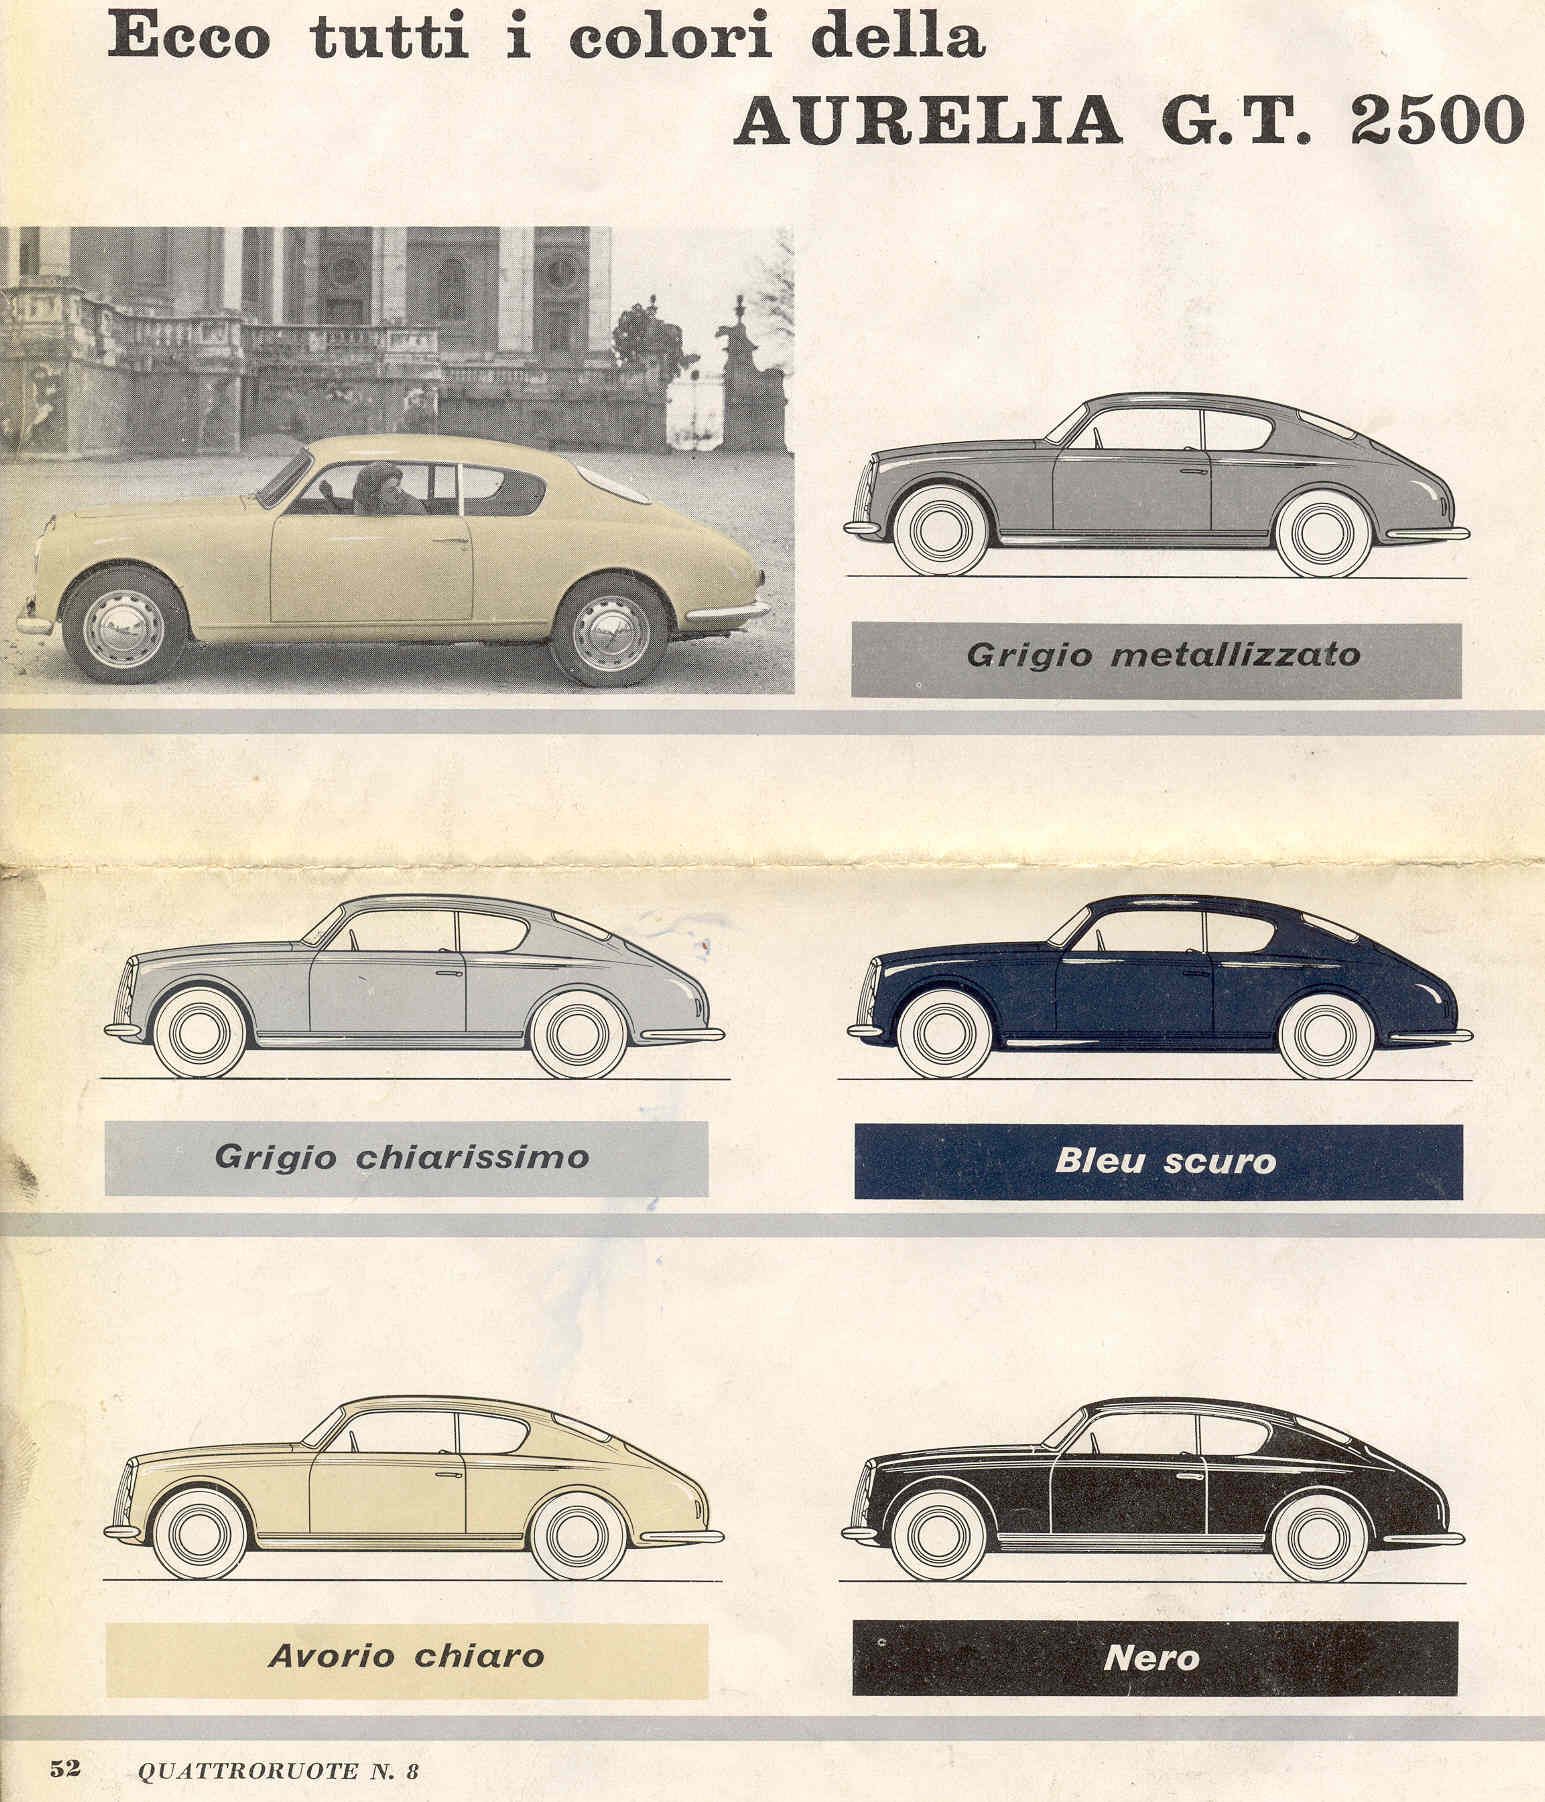
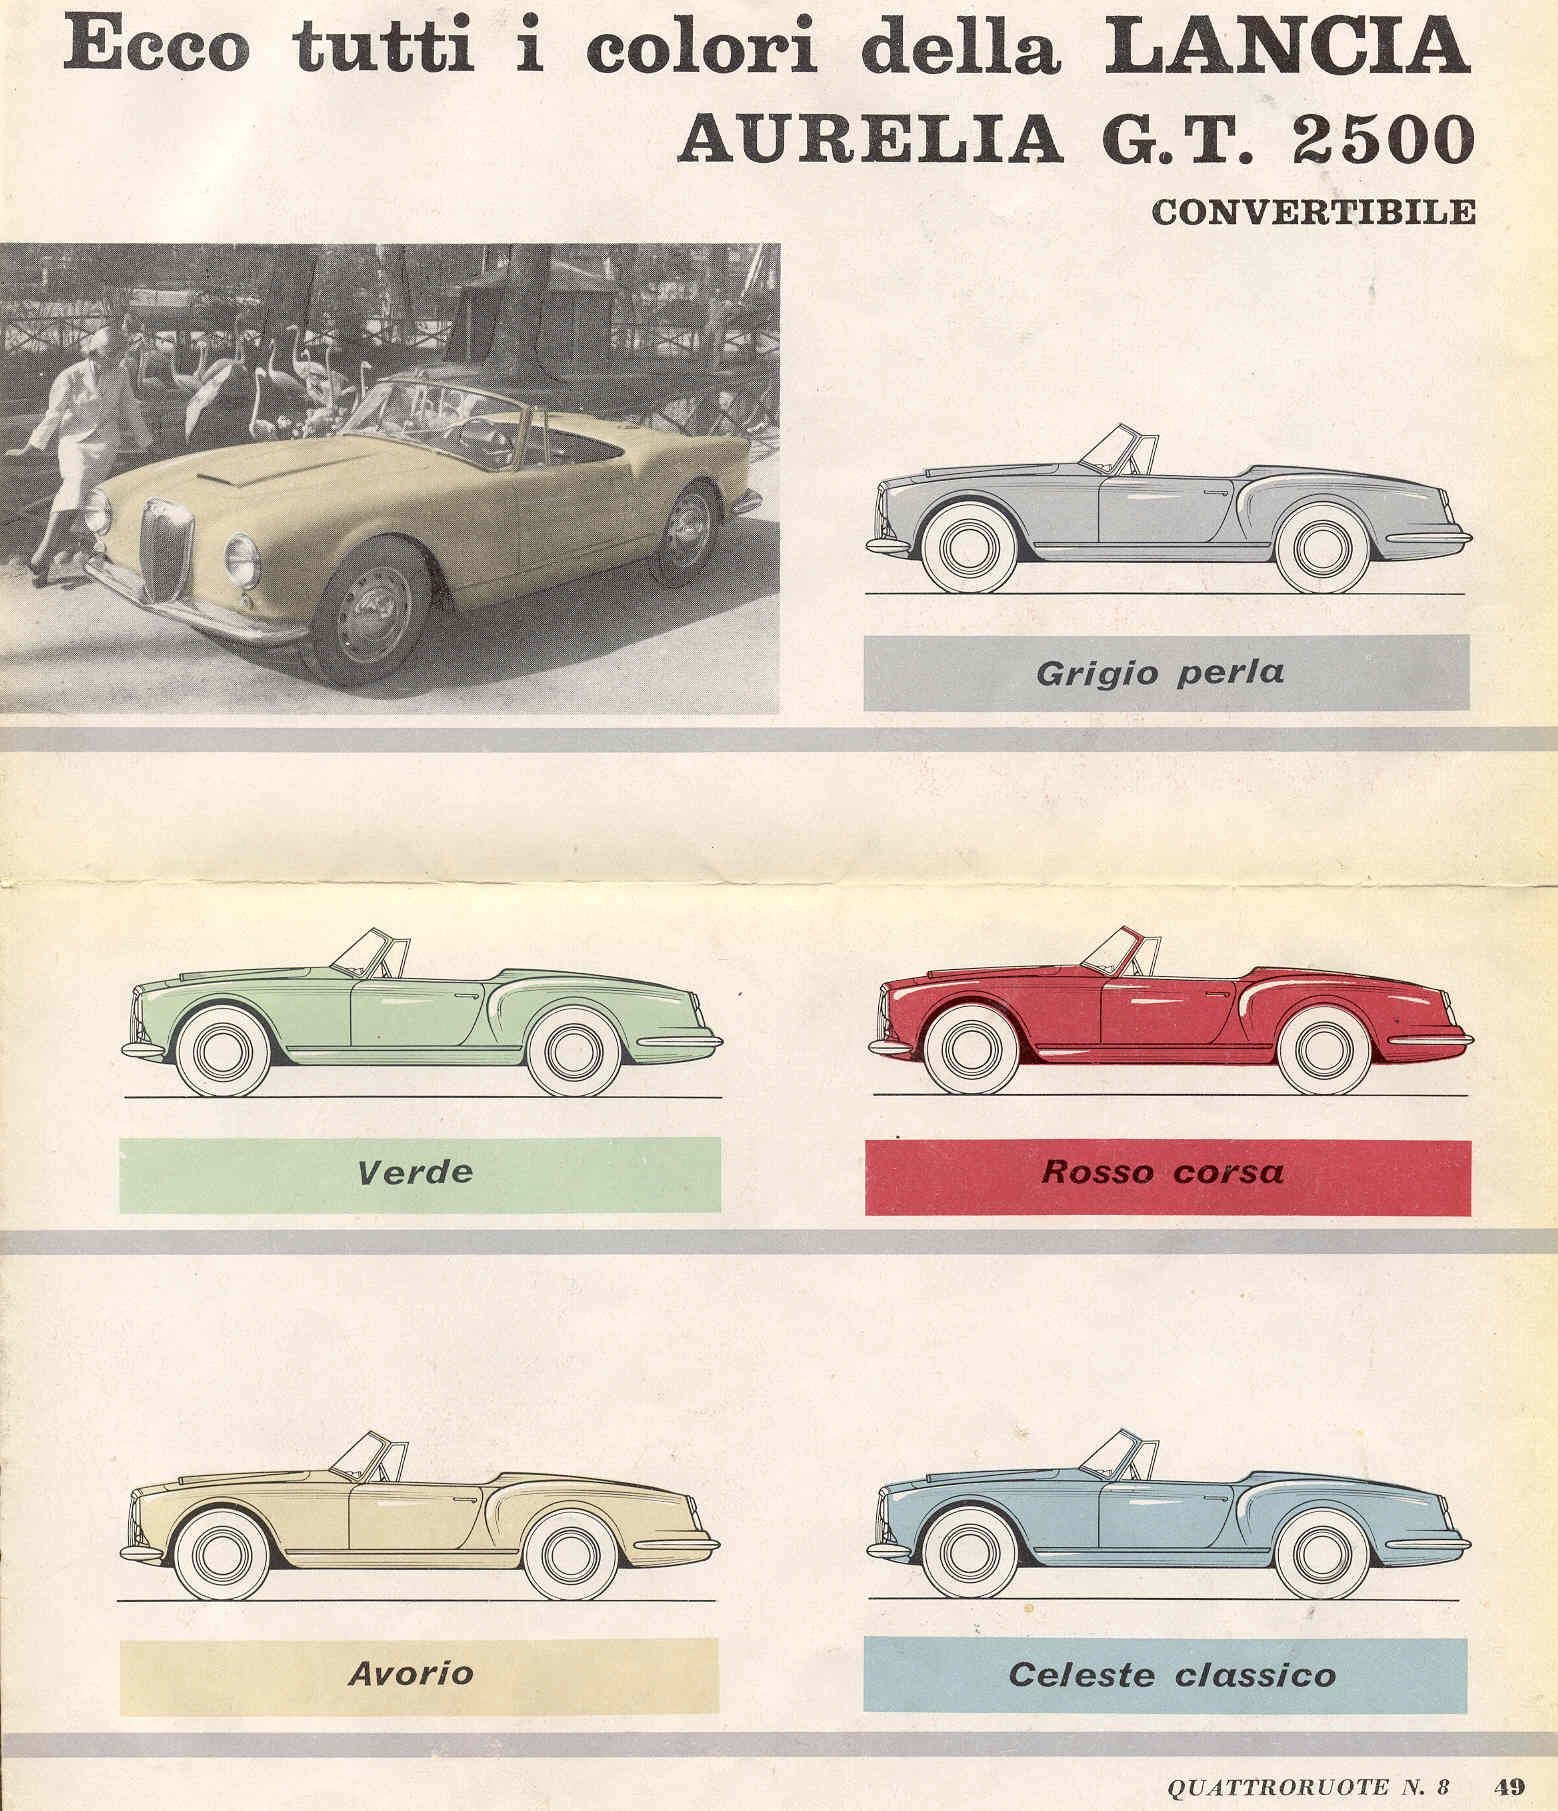
The following information is copied from the magazine ‘Quattroruote N.8 pp 49, 52’. This is probably from the August edition 1956 & would thus refer to the 5th Series B20 & B24S Convertible cars
An Aurelia B20 Under Restoration – Perfetto!
B20-1739 in 2007 fresh from the paint shop – Geoff Goldberg, Chicago, USA